
Focus Tool Calibration
If a lens is out of calibration you will have difficulty producing blurry low resolution images and possible flares may result when cutting some materials. This can easily be solved by calibrating your focus tool, your focus tool is used for manual focus onto materials as well as calibrating your Auto Z feature in the driver software. Each lens has a factory calibrated focus tool that comes with that lens, if lenses are replaced or if the focus tool is dropped they may need to be re-calibrated to maintain the quality. The following instructions provide how to calibrate your focus tool to get the best results from a laser lens.
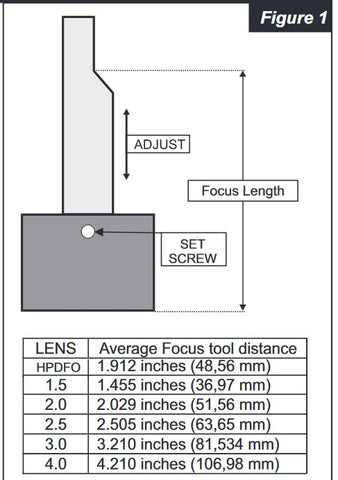
1) Remove the cutting table, or rotary, or any other accessory from inside the system that blocks the motion of the stage (main engraving table) of the laser system. This may require that the laser system is turned on to enable the stage to be moved. You may also measure your focus tool shown in and compare your number to the chart in to see if your tool is close. Note that every focus tool is different; it may not be the same as this chart in , just an average to get you close.
2) If you have no focus method, raise the stage to the distance that is on the chart in , or use your focus tool to get as close to focus as figure 1 possible onto a piece of black anodized aluminum that you place in the middle of the stage.
3) Send a small rectangle from your drawing software to the laser system as a black raster file and arrange it to engrave on the anodized aluminum in the middle of the stage.
4) Run the file using anodized aluminum settings, begin pausing the file and raising and or lowering the stage using the up and down Z buttons on the laser system control panel, continue to do this until the aluminum starts to be marked. If the stage has to be raised to start marking the aluminum, the stage is too low. If the stage has to be lowered to mark the aluminum the stage is too high.
5) Multiple attempts may be needed to get a good mark on the anodized aluminum, this is done by continuing to run the file and move the aluminum a new area of the aluminum to be marked and manually lowering the laser power will provide a more accurate calibration.
6) Adjust the Z height until the engraving is clean and sharp and the flash from the laser working appears the brightest at the lowest possible laser power. Laser response on the material will vary depending on laser wattage used, testing will be required to find the lowest settings, to start
use 10% power and adjust the power and speed as needed.
7) Place the focus tool under the carriage on the front shown in figure 3 loosen the set screw shown on and adjust the focus tool height to match the carriage height from the stage by sliding the shaft up or down. Lock the tool in place by tightening the set screw. The focus tool is now calibrated to the engraver’s optics lens.


For owners of Universal Lasers, replacement focus tools can be purchased here; https://shopabernethybeck.com/collections/universal-laser-optics


